Indoor and outdoor rock climbing have gained in popularity over the last few years. Enthusiasts of the sport claim many physical and mental health benefits associated with this activity.
Many individuals might start climbing indoors and move to the outdoors as they become more experienced. It is a much safer environment indoors making it easier to practice and improve skills. Typically, there are many different climbing routes, including those specifically designed for kids and beginners. Indoor climbing is also possible, regardless of weather conditions. Outdoor climbing allows individuals to be challenged by nature, to get a greater sense of adventure, and experience more difficult and challenging routes.
A recent article in the Journal of Hand Therapy examines pulley injuries among rock climbers, specifically Grade I, II, and II A 2 pulley injuries and the benefits of using a pulley ring orthosis.
The Relevant Anatomy:
The pulley system is comprised of 5 annular and 3 cruciate pulleys situated on the volar aspect of the finger. Their role is to help maintain the position of the flexor tendons adjacent to the finger bones and prevent bow stringing of the tendons. The A2 pulley is situated on the volar aspect of the proximal phalanx. The full “crimp” position in rock climbing is when the pulp of the distal phalanges is loaded causing the distal interphalangeal (DIP) joints to hyperextend while the proximal interphalangeal (PIP) joints are flexed. In this posture, the flexor digitorum profundus (FDP) tendon is developing active tension while elongating, creasing an eccentrically loaded grip as the flexor digitorum profundus tendon (FDP) contracts across the DIP joint; this eccentric loading of the grip occurs as the DIP joints increase in hyperextension while maintaining the PIP position, lengthening the flexor tendons and increasing the bowstringing effect.

Flexor pulleys of the finger – anatomy (source: https://radiopaedia.org/cases/flexor-pulleys-of-the-finger-anatomy#image-64038727)
Injuries to the Pulleys:
Schöffl et al. developed a graded scale to classify pulley injuries. The scale is as follows:
- Grade I: Sprain of the pulley with no bowstringing
- Grade II: Complete A4 rupture or partial A2 and A3 rupture
- Grade III: Complete A2 or A3 rupture
- Grade IV: Rupture of multiple pulleys or combined pulley rupture with lumbrical muscle and/or collateral ligament involvement.
This scale allows surgeons to judge whether surgery is necessary and indeed only Grade IV injuries warrant surgical intervention.
The Study:
The authors of this article performed a prospective case series to monitor rock climbers who wore protective finger orthoses following pulley injuries. This small study included 4 participants who were active rock climbers and had sustained Grade I, II or III injuries to the A2 pulley of one finger.
The participants received a custom pulley ring orthosis using Orficast material which was activated and molded around the proximal phalanx of the injured finger. The orthosis was opened and then reattached using a heat gun to secure the ends together, forming a solid ring. The strength of the pulley ring orthosis was tested and broke only at a force of 67.67 N. Several in- house tests were conducted to ensure that each pulley ring orthosis was effective in protecting the injured pulley. The dorsal aspect of the pulley ring was purposely left weaker in order to break as a safety measure to avoid degloving injuries.
After 12 weeks of use, the results indicate that wearing a pulley ring orthosis helped to decrease pain and allowed for peak crimp and hanging strength. There was no increase in pain or edema even though the participants returned to rock climbing while injured. There have been no reports of degloving injuries while wearing pulley ring orthoses. The authors conclude that low grade pulley injuries can be effectively managed with pulley ring orthoses.
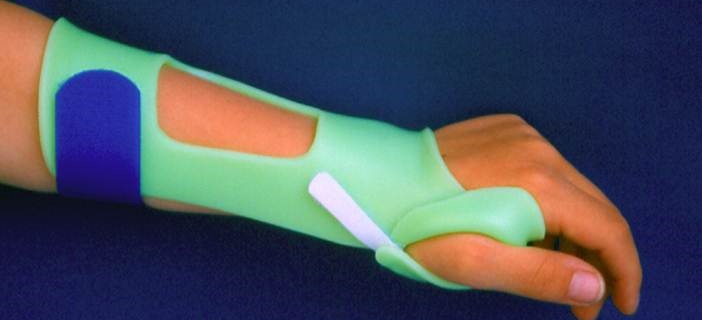
The Pulley Ring Orthosis:
You will need: Orficast 3 cm (1″), a water bath, a heat gun, a tweezer
Preparation: Cut a strip of Orficast of about 10 cm (4″) long, and a strip of Orficast of about 4 cm (1.5″) long.
Fabrication Steps:
-
Activate the 10 cm (4″) and 4 cm (1.5″) pieces of Orficast in a splint pan for approximately 10 seconds.
-
Fold the long piece in half lengthwise to make it more rigid and double thickness.
-
Attach the short piece of Orficast to the middle of the long piece. This additional layer will add pressure over the A2 pulley area.
-
Wrap the material around the proximal phalanx of the involved digit. Ensure it is still warm and pliable when wrapping around the finger.
-
Pinch the 2 tails together at the dorsal proximal phalanx.
-
Cut off the dorsal tails of the orthosis.
-
Cut the length-side edges to make the Orficast smooth and narrow. This will avoid impingement of active range of motion.
-
Break apart the orthosis ring and re-adhere using a heat gun and tweezer for 8- 10 seconds. Re-adhering the ends together sub- maximally is a safety measure.

Pulley Ring Orthosis
Watch the video tutorial here
Reference
Hartnett, E., Bondoc, S., & Feretti, A. M. (2023). Climbing while healing: An orthotic intervention for rock climbers with a low-grade A2 pulley injury, a case series. Journal of Hand Therapy.


Written by Debby Schwartz, OTD, OTR/L, CHT
Physical Rehabilitation Product and Educational Specialist at Orfit Industries America.
Debby is a certified hand therapist with over 36 years of clinical experience. She completed her Doctorate of Occupational Therapy at Rocky Mountain University of Health Professions in 2010. She has worked at Orfit Industries America as Product and Educational Specialist since 2007.
Debby is also an adjunct professor at the Occupational Therapy Department of Touro University, School of Health Sciences, and at the Occupational Therapy Department at Yeshiva University, Katz School of Science and Health in NYC. She has written many book chapters in the field of hand therapy and multiple articles for hand therapy journals, including the ASHT Times and the Journal of Hand Therapy. She has published a new textbook on orthotic fabrication together with Dr. Katherine Schofield, entitled “Orthotic Design and Fabrication for the Upper Extremity: A Practical Guide”.
Debby’s Google Scholar